Zabudované objekty
Pygame Zero poskytuje užitočné zabudované objekty, ktoré vám pomôžu vytvárať vaše hry jednoduchšie.
Screen
Objekt screen reprezentuje vašu hernú obrazovku.
It is a thin wrapper around a Pygame surface that allows you to easily draw images to the screen („blit“ them).
-
class
Screen¶ -
surface¶ Referencia na Pygame surface, ktorý reprezentuje buffer obrazovky. Môžete ho použiť na pokročilé grafické úlohy.
-
clear()¶ Resetuje obrazovku na čierno.
-
fill((red, green, blue))¶ Vyplní obrazovku farbou.
-
blit(image, (left, top))¶ Vykreslí obrázok na obrazovku na zadanú pozíciu.
blit()akceptuje buďSurfacealebo reťazec ako jej parameterimage. Ak jeimagereťazec (str), tak sa nahrá obrázok s týmto názvom z priečinkuimages/.
-
draw.line(start, end, (r, g, b))¶ Nakreslí čiaru od počiatočného bodu (
start) po koncový (end).
-
draw.circle(pos, radius, (r, g, b))¶ Nakreslí kružnicu.
-
draw.filled_circle(pos, radius, (r, g, b))¶ Nakreslí kruh.
-
draw.filled_rect(rect, (r, g, b))¶ Nakreslí vyplnený obdĺžnik.
-
draw.text(text, [pos, ]**kwargs)¶ Nakreslí text.
K dispozícii je bohaté API pre umiestňovanie a formátovanie textu; pre zobrazenie kompletnej dokumentácie navštívte Text Formatting.
-
draw.textbox(text, rect, **kwargs)¶ Nakreslí text, ktorý vyplní daný Rect.
K dispozícii je bohaté API pre formátovanie textu; pre zobrazenie kompletnej dokumentácie navštívte Text Formatting.
-
Rect
Trieda Pygame Rect je dostupná ako zabudovaná. Je možné ju použiť mnohými spôsobmi, ako napríklad na detekciu kliknutí v oblasti ohraničenej práve obdĺžnikom:
Obdĺžnik nakreslíte napríklad takto:
RED = 200, 0, 0
BOX = Rect((20, 20), (100, 100))

def draw():
    screen.draw.rect(BOX, RED)
Nahrávanie zdrojov
The images and sounds objects can be used to load images and sounds
from files stored in the images and sounds subdirectories respectively.
Pygame Zero will handle loading of these resources on demand and will cache
them to avoid reloading them.
You generally need to ensure that your images are named with lowercase letters, numbers and underscores only. They also have to start with a letter.
File names like these will work well with the resource loader:
alien.png
alien_hurt.png
alien_run_7.png
These will not work:
3.png
3degrees.png
my-cat.png
sam's dog.png
Obrázky
Pygame Zero can load images in .png, .gif, and .jpg formats. PNG is
recommended: it will allow high quality images with transparency.
We need to ensure an images directory is set up. If your project contains the following files:
space_game.py
images/alien.png
Then space_game.py could draw the ‚alien‘ sprite to the screen with this
code:
def draw():
    screen.clear()
    screen.blit('alien', (10, 10))
The name passed to blit() is the name of the image file within the images
directory, without the file extension.
Or using the Aktéri API,
alien = Actor('alien')

def draw():
    alien.draw()
There are some restrictions on the file names in both cases: they may only contain lowercase latin letters, numbers and underscores. This is to prevent compatibility problems when your game is played on a different operating system that has different case sensitivity.
Image Surfaces
You can also load images from the images directory using the images
object. This allows you to work with the image data itself, query its
dimensions and so on:
forest = []
for i in range(5):
    forest.append(
        Actor('tree', topleft=(images.tree.width * i, 0))
    )
Each loaded image is a Pygame Surface. You will typically use
screen.blit(...) to draw this to the screen. It also provides handy methods
to query the size of the image in pixels:
-
class
Surface¶ -
get_width()¶ Returns the width of the image in pixels.
-
get_height()¶ Returns the height of the image in pixels.
-
get_size()¶ Returns a tuple (width, height) indicating the size in pixels of the surface.
-
get_rect()¶ Get a
Rectthat is pre-populated with the bounds of the image if the image was located at the origin.Effectively this is equivalent to:
Rect((0, 0), image.get_size())
-
Zvuky
Pygame Zero can load sounds in .wav and .ogg formats. WAV is great for
small sound effects, while OGG is a compressed format that is more suited to
music. You can find free .ogg and .wav files online that can be used in your
game.
We need to ensure a sounds directory is set up. If your project contains the following files:
drum_kit.py
sounds/drum.wav
Then drum_kit.py could play the drum sound whenever the mouse is clicked
with this code:
def on_mouse_down():
    sounds.drum.play()
Each loaded sound is a Pygame Sound, and has various methods to play and
stop the sound as well as query its length in seconds:
-
class
Sound¶ -
play()¶ Play the sound.
-
play(loops) Play the sound, but loop it a number of times.
Parametre: loops – The number of times to loop. If you pass -1as the number of times to loop, the sound will loop forever (or until you callSound.stop()
-
stop()¶ Stop playing the sound.
-
get_length()¶ Get the duration of the sound in seconds.
-
You should avoid using the sounds object to play longer pieces of music.
Because the sounds sytem will fully load the music into memory before playing
it, this can use a lot of memory, as well as introducing a delay while the
music is loaded.
Hudba
Nové vo verzii 1.1.
Varovanie
The music API is experimental and may be subject to cross-platform portability issues.
In particular:
- MP3 may not be available on some Linux distributions.
- Some OGG Vorbis files seem to hang Pygame with 100% CPU.
In the case of the latter issue, the problem may be fixed by re-encoding (possibly with a different encoder).
A built-in object called music provides access to play music from within
a music/ directory (alongside your images/ and sounds/ directories,
if you have them). The music system will load the track a little bit at a time
while the music plays, avoiding the problems with using sounds to play
longer tracks.
Another difference to the sounds system is that only one music track can be playing at a time. If you play a different track, the previously playing track will be stopped.
-
music.play(name)¶ Play a music track from the given file. The track will loop indefinitely.
This replaces the currently playing track and cancels any tracks previously queued with
queue().You do not need to include the extension in the track name; for example, to play the file
handel.mp3on a loop:music.play('handel')
-
music.play_once(name)¶ Similar to
play(), but the music will stop after playing through once.
-
music.queue(name)¶ Similar to
play_once(), but instead of stopping the current music, the track will be queued to play after the current track finishes (or after any other previously queued tracks).
-
music.stop()¶ Stop the music.
-
music.pause()¶ Pause the music temporarily. It can be resumed by calling
unpause().
-
music.unpause()¶ Unpause the music.
-
music.is_playing()¶ Returns True if the music is playing (and is not paused), False otherwise.
-
music.fadeout(duration)¶ Fade out and eventually stop the current music playback.
Parametre: duration – The duration in seconds over which the sound will be faded out. For example, to fade out over half a second, call music.fadeout(0.5).
-
music.set_volume(volume)¶ Set the volume of the music system.
This takes a number between 0 (meaning silent) and 1 (meaning full volume).
-
music.get_volume()¶ Get the current volume of the music system.
If you have started a music track playing using music.play_once(), you
can use the on_music_end() hook to do something when the
music ends - for example, to pick another track at random.
Clock
Often when writing a game, you will want to schedule some game event to occur at a later time. For example, we may want a big boss alien to appear after 60 seconds. Or perhaps a power-up will appear every 20 seconds.
More subtle are the situations when you want to delay some action for a shorter period. For example you might have a laser weapon that takes 1 second to charge up.
We can use the clock object to schedule a function to happen in the
future.
Let’s start by defining a function fire_laser that we want to run in the
future:
def fire_laser():
    lasers.append(player.pos)
Then when the fire button is pressed, we will ask the clock to call it for
us after exactly 1 second:
def on_mouse_down():
    clock.schedule(fire_laser, 1.0)
Note that fire_laser is the function itself; without parentheses, it is
not being called here! The clock will call it for us.
(It is a good habit to write out times in seconds with a decimal point, like
1.0. This makes it more obvious when you are reading it back, that you are
referring to a time value and not a count of things.)
clock provides the following useful methods:
-
class
Clock¶ -
schedule(callback, delay)¶ Schedule callback to be called after the given delay.
Repeated calls will schedule the callback repeatedly.
Parametre: - callback – A callable that takes no arguments.
- delay – The delay, in seconds, before the function should be called.
-
schedule_unique(callback, delay)¶ Schedule callback to be called once after the given delay.
If callback was already scheduled, cancel and reschedule it. This applies also if it was scheduled multiple times: after calling
schedule_unique, it will be scheduled exactly once.Parametre: - callback – A callable that takes no arguments.
- delay – The delay, in seconds, before the function should be called.
-
schedule_interval(callback, interval)¶ Schedule callback to be called repeatedly.
Parametre: - callback – A callable that takes no arguments.
- interval – The interval in seconds between calls to callback.
-
unschedule(callback)¶ Unschedule callback if it has been previously scheduled (either because it has been scheduled with
schedule()and has not yet been called, or because it has been scheduled to repeat withschedule_interval().
-
Note that the Pygame Zero clock only holds weak references to each callback you give it. It will not fire scheduled events if the objects and methods are not referenced elsewhere. This can help prevent the clock keeping objects alive and continuing to fire unexpectedly after they are otherwise dead.
The downside to the weak references is that you won’t be able to schedule lambdas or any other object that has been created purely to be scheduled. You will have to keep a reference to the object.
Aktéri
Keď sa vám začne v hre pohybovať veľa obrázkov, bolo by praktické mať k dispozícii
niečo, čo drží na jednom mieste obrázok spolu s pozíciou, kde sa má vykresliť.
Každý pohybujúci sa obrázok na obrazovke budeme volať aktér a bude reprezentovaný
triedou Actor. Pre vytvorenie aktéra vám bude stačiť zadať názov obrázku
(z priečinku s obrázkami, ako bolo uvedené vyššie). Vykresliť mimozemšťana,
o ktorom sme hovorili vyššie, môžete takto:
alien = Actor('alien', (50, 50))

def draw():
    screen.clear()
    alien.draw()
Pohybovať s aktérom môžete zmenou jeho atribútu pos vo funkcii update():
def update():
    if keyboard.left:
        alien.x -= 1
    elif keyboard.right:
        alien.x += 1
Zmeniť jeho obrázok, ktorý reprezentuje aktéra, môžete nastavením jeho atribútu
image na nejaký nový názov obrázku:
alien.image = 'alien_hurt'
Aktéri majú všetky metódy a atribúty rovnaké ako Rect, vrátane metód ako .colliderect(), ktorá sa zistí, či dvaja aktéri nie sú v kolízii.
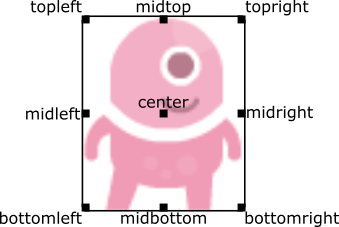
Umiestňovanie aktérov
Ak do niektorého pozičného atribútu priradíte novú hodnotu, aktér bude presunutý. Napríklad:
alien.right = WIDTH
presunie mimozemšťana tak, že jeho pravý okraj bude nastavený na WIDTH.
Podobne môžete nastaviť počiatočnú polohu aktéra odovzdaním do konštruktora
jedného z týchto kľúčových slov ako keyword argument: pos,
topleft, topright, bottomleft, bottomright, midtop,
midleft, midright, midbottom alebo center:
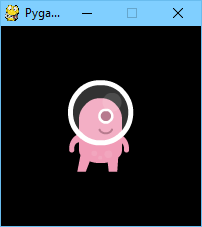
Toto môže byť zabezpečené počas vytvárania alebo alebo priradením páru súradníc x, y. Napríklad:
WIDTH = 200
HEIGHT = 200

alien = Actor('alien', center=(100,100))

def draw():
    screen.clear()
    alien.draw()
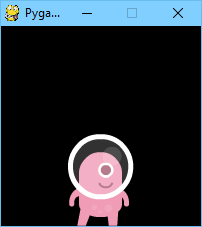
Zmenou center=(100, 100) na midbottom=(100, 200) dostanete:
Ak nezadáte počiatočnú pozíciu, aktér bude umiestnený v ľavom hornom rohu
(ekvivalent zápisu topleft=(0, 0)).
Anchor point
Aktéri majú „anchor position“, čo je praktický spôsob, ako umiestniť aktéra do scény.
Predvolene je tento bod v strede, takže atribút .pos referuje
na stred aktéra (rovnako aj súradnice x a y).
Je bežné chcieť zmeniť anchor point na inú časť sprite-u (možno na nohu, aby bolo
jednoduché nastaviť aktéra tak, že na niečom „stojí“):
alien = Actor('alien', anchor=('center', 'bottom'))
spaceship = Actor('spaceship', anchor=(10, 50))
anchor je špecifikovaná ako entica (xanchor, yanchor), kde hodnoty môžu
byť desatinné čísla alebo reťazce left, center/middle, right, top alebo
bottom podľa potreby.
Otáčanie
Nové vo verzii 1.2.
Atribút aktéra .angle riadi otáčanie sprite-u v stupňoch proti smeru hodinových ručičiek.
Stredom otáčania je aktérov anchor point.
Pozor však na to, že dôjde k zmene atribútov width a height aktéra.
Ako príklad môže byť pomalé otáčanie sprite-u asteroidu vo vesmíre proti smeru hodinových ručičiek:
asteroid = Actor('asteroid', center=(300, 300))

def update():
    asteroid.angle += 1
Aby sa začal otáčať v smere hodinových ručičiek, zmeníme funkciu update() takto:
def update():
    asteroid.angle -= 1
Ako ďalší príklad urobíme aktéra ship, ktorý sa vždy otočí smerom ku kurzoru myši.
Keďže angle_to() vráti hodnotu 0 pre „pravú stranu“, sprite,
ktorý použijeme pre „ship“ by mal byť natočený doprava:
ship = Actor('ship')

def on_mouse_move(pos):
    ship.angle = ship.angle_to(pos)

Nezabudnite, že uhly loop round, takže 0 stupňov == 360 stupňov == 720 stupňov. Taktiež -180 stupňov == 180 stupňov.
Vzdialenosť a uhol medzi aktérmi
Aktéri majú prktické metódy pre výpočet ich vzdialenosti alebo uhlu k ďalšiemu
aktérovi alebo voči páru súradníc (x, y).
-
Actor.distance_to(target)¶ Vráti vzdialenosť od pozície tohto aktéra k cieľu v pixeloch.
-
Actor.angle_to(target)¶ Vráti uhol medzi pozíciou tohto aktéra a cieľom v stupňoch.
Metóda vráti číslo v rozsahu od -180 do 180 stupňov. Vpravo je 0 stupňov a uhol rastie proti smeru hodinových ručičiek. This will return a number between -180 and 180 degrees. Right is 0 degrees
Takže:
- Vľavo je 180 stupňov.
- Hore je 90 stupňov.
- Dolu je -90 stupňov.
Klávesnica
Určite ste si všimli, že sme v kódoch vyššie používali keyboard.
Ak by ste chceli vedieť, aké klávesy boli stlačené na klávesnici, môžete sa na
ne dopytovať pomocou atribútov zabudovanej triedy keyboard. Ak je napríklad
podržaný kláves šípka vľavo, tak keyboard.left bude True,
v opačnom prípade bude False.
Atribút existuje pre každý kláves; niekoľko príkladov:
keyboard.a  # kláves 'A'
keyboard.left  # kláves ľavej šípky
keyboard.rshift  # kláves pravej šípky
keyboard.kp0  # kláves '0' na numerickej klávesnici
keyboard.k_0  # kláves '0' na hlavnej klávesnici
Kompletný zoznam konštánt jednotlivých kláves nájdete v dokumentácii Tlačidlá a klávesy, ale atribúty sú malými písmenami, pretože sa jedná o premenné a nie konštanty.
Zastarané od verzie 1.1: Názvy atribútov s veľkými písmenami alebo s prefixom (napr. keyboard.LEFT
alebo keyboard.K_a) sú odteraz zastarané; používajte miesto nich názvy
atribútov malými písmenami.
Nové vo verzii 1.1: Odteraz sa taktiež môžete dopytovať na stav kláves pomocou ich vlastných klávesových konštánt:
keyboard[keys.A]  # True ak bol stlačený kláves 'A'
keyboard[keys.SPACE]  # True ak bol stlačený medzerník
Animácie
V knižnici pygame môžete animovať väčšinu vecí pomocou zabudovanej funkcie
animate(). Napríklad, ak chcete presunúť Actor z jedho aktuálnej
polohy na obrazovke na pozíciu (100, 100):
animate(alien, pos=(100, 100))
-
animate(object, tween='linear', duration=1, on_finished=None, **targets)¶ Animate the attributes on object from their current value to that specified in the targets keywords.
Parametre: - tween – The type of tweening to use.
- duration – Trvanie animácie v sekundách.
- on_finished – Funkcia, ktorá má byť zavolaná po skončení animácie.
- targets – Cieľové hodnoty atribútov pre animáciu.
Hodnota tween argumentu môže byť jedna z nasledujúcich:
| ‚linear‘ | Animácia konštantnou rýchlosťou zo začiatku do cieľa |
| ‚accelerate‘ | Začne pomaly a zrýchľuje až do konca |
| ‚decelerate‘ | Začne rýchlo a spomaľuje až do cieľa |
| ‚accel_decel‘ | Zrýchľuje do stredu a spomaľuje do konca |
| ‚in_elastic‘ | Give a little wobble at the end |
| ‚out_elastic‘ | Have a little wobble at the start |
| ‚in_out_elastic‘ | Have a wobble at both ends |
| ‚bounce_end‘ | Accelerate to the finish and bounce there |
| ‚bounce_start‘ | Bounce at the start |
| ‚bounce_start_end‘ | Bounce at both ends |
Funkcia animate() vrátiu inštanciu triedy Animation:
-
class
Animation¶ -
stop(complete=False)¶ Zastaví animáciu, voliteľne dokončí prechod do cieľových hodnôt vlastností.
Parametre: complete – Nastaví atribút animácie na jeho konečnú hodnotu.
-
running¶ Bude mať hodnotu
True, ak je animácia spustená. A hodnotuFalse, ak uplynula alebo bola pred uplynutím zavolaná metódastop().
-
on_finished¶ Tento atribút môžete nastaviť na funkciu, ktorá má byť zavolaná, keď sa ukončí prehrávanie animácie. Nezavolá sa, ak bola zavolaná metóda
stop(). Táto funkcia nemá žiadne argumenty. You may set this attribute to a function which will be called when the animation duration runs out. Theon_finishedargument toanimate()also sets this attribute. It is not called whenstop()is called. This function takes no arguments.
-
Generátor tónov
Nové vo verzii 1.2.
Pygame Zero can play tones using a built-in synthesizer.
-
tone.play(pitch, duration)¶ Play a note at the given pitch for the given duration.
Duration is in seconds.
The pitch can be specified as a number in which case it is the frequency of the note in hertz.
Alternatively, the pitch can be specified as a string representing a note name and octave. For example:
'E4'would be E in octave 4.'A#5'would be A-sharp in octave 5.'Bb3'would be B-flat in octave 3.
Creating notes, particularly long notes, takes time - up to several milliseconds. You can create your notes ahead of time so that this doesn’t slow your game down while it is running:
-
tone.create(pitch, duration)¶ Create and return a Sound object.
The arguments are as for play(), above.
This could be used in a Pygame Zero program like this:
beep = tone.create('A3', 0.5)

def on_mouse_down():
    beep.play()